| Tool Mentor: CAM WS - Detect and Log Event |
 |
|
| Related Elements |
|---|
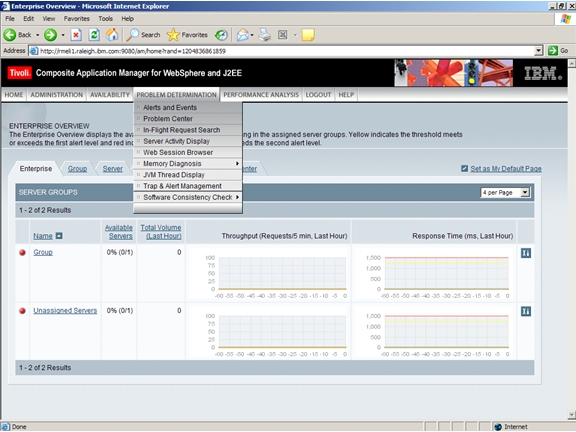
ContextTool mentors explain how a tool can perform tasks, which are part of ITUP processes and activities. The tasks are listed as Related Elements in the Relationships section. You can see the details of how processes and activities are supported by this tool mentor, by clicking the links next to the icons: DetailsITCAM for WebSphere® and ITCAM for J2EE offer a “Trap and Alert Management” function. This feature is especially useful for catching intermittent problems which often come and go in a completely imprevisible manner. The user can specify which actions are to be taken by the tool when the trap fires. Traps can be set against Server Resources as well as against Applications. To set a trap:
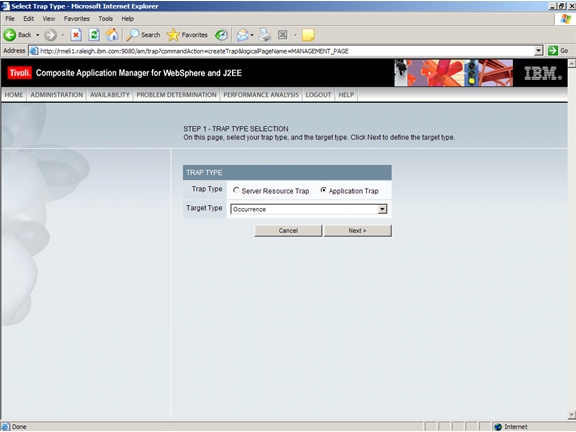
On the left navigation, click Create Trap. The Trap Type selection page opens. Select Application Trap as the trap type.
Select one of the Target Types from the drop-down menu. Based on the target type you select, the system will dynamically generate the trap definition options in the next step. The following is a list of the Target Types:
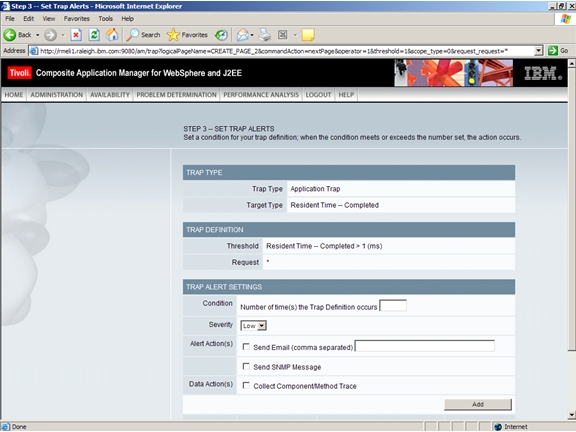
Traps is now supported in CICS. CICS has the following trap types available: Occurrence, CPU time, Resident Time - Completed, Resident Time - In-flight, and Wait Time. Click Next. The “Define Trap” page opens. Complete the rest of the fields in the Trap Definition section, which restrict which events will trigger the trap to fire. Click Next. The Set Trap Alerts page opens. For the Trap Alert settings, under Condition enter the number of times the trap should occur before the system takes an action.
Click to select the severity level from the drop-down box. The application monitor has three severity levels. Since the
application monitor provides SNMP integration with Tivoli®, the three severity levels of the application monitor should
be mapped to the warning levels of Tivoli as below:
Select an action or multiple actions, such as sending an e-mail or SNMP message, for the system to take when the condition is met. Select one or all Data Actions, such as Component/Method Trace, Stack Trace, or Thread Dump (not applicable to the Windows platform), to get detailed information. We recommend that you select Component/Method Trace as the data action, since a request executes quickly and it is difficult to catch before completion. Make sure that you have selected L3 monitoring level if you choose to collect Component/Method Trace as the Data Action. When setting a trap, you can select multiple trigger conditions and alerts for each action set. Each trap is required to have at least one action but may have multiple actions set. Thread Dump is not available for CICS.
Click Add to add the alert to your trap. If you select Component/Method Trace as the Data Action for an In-flight-based trap, the method trace may contain a "-1" for Depth on some events in the method trace. In-flight transactions, by definition, are incomplete transactions, so the request stacks of those transactions will be incomplete.
Set the Default Suppression settings by entering the amount of time you want to delay alerts after the first alert is
sent. Enter a name and descriptive text for your trap. Click Save & Activate, and the trap is set. For details on how to configure monitoring using ITCAM for WebSphere, consult the User Guide and Operator's Guide. For More InformationFor more information about this tool, click on the link for this tool at the top of this page. |
©Copyright IBM Corp. 2005, 2008. All Rights Reserved. |